Al's Homebrewery - Page 6
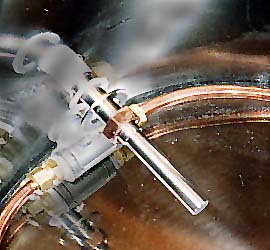
So, here we are inside the kettle. First the electrical nut goes on the
thermowell, then the thermowell goes through the hole I cut with a
hole saw, then on goes the home-made teflon washer, then a stainless steel
flat washer (Ace Hardware) and
finally my home-made NPT copper nut.
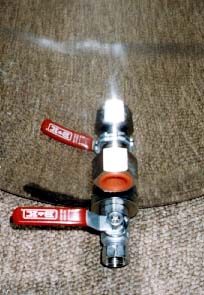
Here's the outside after I tightened everything down snugly. The orange
cap pops off and the bimetal dial thermometer screws into the thermowell.
I know I could have simply opened the kettle and dipped a floating
thermometer in to the mash or wort, but this setup does allow me to avoid
opening the lid of the mash tun (and losing heat) and it means I can
minimize the chance that some wild yeast or bacteria will float into my
cooled wort. I had even debated mounting the immersion chiller coils
permanently through the wall of the kettle. Who knows... I may still
do that.
Oh, incidentally, I still use an immersion chiller despite the
fact that with the ball valve on the kettle, I could easily use a
counterflow chiller. One reason I like the immersion chiller is that
I can leave a lot of the cold break behind in the kettle. This means
one less transfer and less chance for infection. Now that I use loose
(no hop bag) whole hops in the kettle, they form a sort of filter
around the SureScreensTM and
further minimize the carryover of cold break.
One more possible addition to this kettle is to permanently mount an
airstone in the side of the kettle. While this would eliminate the need
to remember to dunk the airstone into the boiling wort to sanitize it before
chilling, it would be difficult to clean and the caramelized wort may eventually
clog much of the stone.

Here's the finished TridentTM Mashing
sytem. I prefer it to a false bottom or slotted pipe design because
of the very small amount of recirculation needed to get a clear runoff
and because I like to be able to stir all the way to the bottom when I heat
the tun with a direct fire.
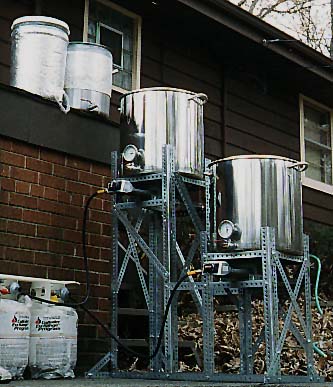 Currently,
I'm still brewing outdoors, which rules out the hottest summer and coldest
winter days. Note the insulated bucket and my old 10-gallon stainless steel
kettle up on the garage roof. During the mash, I heat up the sparge
water in the kettle and transfer it (usually with a plastic jug because,
again, the flow rate through the 3/8" ball valve is too slow.
When I do run off into the kettle, I use silicone tubing (McMaster-Carr)
so that I can start the burners in the kettle as soon as I have
a gallon or two of wort collected (silicone is useable to 500°F). (Note
that those dry leaves are actually a good 10 feet away from those burners!)
Currently,
I'm still brewing outdoors, which rules out the hottest summer and coldest
winter days. Note the insulated bucket and my old 10-gallon stainless steel
kettle up on the garage roof. During the mash, I heat up the sparge
water in the kettle and transfer it (usually with a plastic jug because,
again, the flow rate through the 3/8" ball valve is too slow.
When I do run off into the kettle, I use silicone tubing (McMaster-Carr)
so that I can start the burners in the kettle as soon as I have
a gallon or two of wort collected (silicone is useable to 500°F). (Note
that those dry leaves are actually a good 10 feet away from those burners!)
Eventually, I plan to move this whole system indoors under an exhaust
hood. I intend to have three or four stainless steel tanks mounted
high on the wall to the left of the mash tun for strike water (the water
with which you begin) and sparge water (the with which water you rinse
the grains after the mash). I hope to make use of my electrical engineering
degrees and build a thermostatic/timer controller for the immersion heaters
I plan to mount in each of these hot liquor tanks. The tanks will
have calibrated sight glasses mounted so I can easily fill each with
the proper amount of water. I'll simply fill the proper number of tanks
(depending on the complexity of the mash schedule and the size of the batch)
with the proper amount of water in the morning, programme the controller,
and when I get home in the evening, I'll have all my liquor at the
right temperatures, ready to mash-in. I will also be able to relax
during the mash, not having to worry about heating and moving the sparge
water.
Back to Page 5
To the BrewInfo Page (Home)
Copyright © 1997 Al Korzonas - All Rights Reserved